


Executive Summary:
An image-processing technique called license plate recognition is used to recognize cars based on their license plates. Applications for traffic and security employ this technology. This tutorial will use OpenCV and Python to create a simple Automated License/Number Plate Recognition (ANPR) system.
Systems for automatically reading license plates come in various sizes and shapes.
- Basic image processing techniques can be used in ANPR under-regulated lighting settings with predictable license plate types.
- More sophisticated ANPR systems use specialized object detectors like HOG + Linear SVM, Faster R-CNN, SSDs, and YOLO to locate license plates in photos.
- State-of-the-art Recurrent neural networks (RNNs) and long short-term memory networks (LSTMs) are used in ANPR software to improve the OCR of the text from the actual license plates.
The need for real-time operation makes automatic license/number plate recognition much more difficult.
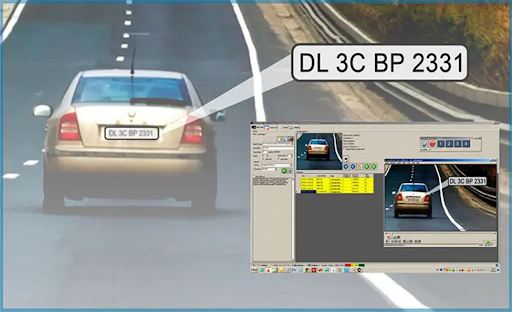
Consider a toll road with an ANPR system installed. To enable billing of the toll to the owner of the vehicle, it must be able to recognize the license plate of every passing vehicle, OCR the characters on the plate, and then store this information in a database.
We’ll construct a simple automatic license/number plate recognition system in this lesson. By the end of this guide, you’ll have a template or starting point to create your own ANPR projects.
Continue reading to learn to use OpenCV and Python to create a simple automatic License Plate Recognition system.
You will discover and define automatic license/number plate recognition in the first section of this course. After that, we’ll go over the organization of our project. Afterwards, we’ll demonstrate how to construct PyImageSearchANPR, a simple Python class that locates license plates in images before OCRing the text. Finally, we’ll review the output of our ANPR system as we wind up the lesson.

What is Automatic License/Number Plate Recognition (ANPR/ALPR)?
The following steps are included in the automatic license/number plate recognition (ANPR/ALPR) procedure:
- The first step is to locate and identify a license plate in an input image or frame.
- Remove the characters from the plate in the second step
- Use optical character recognition (OCR) software to identify the characters extracted in the third step.
Due to the wide variety of number plate types in different states and nations, automatic number plate recognition (ANPR) is often considered a very difficult subfield in computer vision.
The following factors make license plate recognition systems more difficult:
- lighting conditions that are constantly changing, causing reflections, shadows, and blur
- vehicles driving quickly
- Obstructions
Large and reliable ANPR datasets for training and testing are also challenging to come by because of
- These files include the time and location of a vehicle and its driver and sensitive, private information.
- These files are carefully guarded as confidential information by ANPR firms and government organizations.
As a result, the initial step in an ANPR project is often to gather information and amass sufficient examples of plates under diverse scenarios.
ANPR/ALPR implementation using Python and OpenCV
Our script for automatic license plate recognition is prepared to be put into action.
As indicated, we’ll use the Python class PyImageSearchANPR to keep our code clean and well-structured. This class offers a reusable method for character OCR and localizing license plates.
Let’s get started by reviewing the script by opening anpr.py:
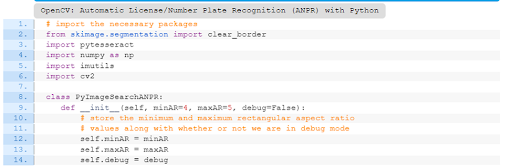
You might be familiar with some of our imports if you’ve been following along with my prior OCR lectures. You should become more familiar with Scikit-clear_ learn’s border function, which helps to tidy up image borders.
Line 8 is where our PyImageSearchANPR class begins. Three parameters are accepted by the function Object() { [native code] }:
- The minimal aspect ratio (minAR), with a default value of 4, is used to identify and filter rectangular license plates.
- maxAR: The license plate rectangle’s maximum aspect ratio, with a default value of 5.
- a flag to indicate whether or not we should show preliminary outcomes from our image processing pipeline.
A license plate typically has rectangular proportions, and the aspect ratio range (minAR to maxAR) fits that description. However, if you need to change the aspect ratio specifications, keep these things in mind:
- License plates from other European countries are frequently longer and shorter than those from the United States. This session will discuss something other than U.S. license plates or number plates.
- For a highly accurate license plate system, this is a real edge case that would have to be considered (one that we won’t work on in this tutorial). Motorcycles and big trash trucks occasionally mount their plates horizontally.
- We won’t consider this edge situation because it is permitted in some nations and areas to use multi-line plates with a nearly 1:1 aspect ratio.
On Lines 12 through 14, each of our function Object() { [native code] } parameters is converted into a class variable so that the class’s functions can access it.
Troubleshooting our workflow for computer vision
Let’s define a helper method to display results at various stages of the imaging pipeline when in debug mode now that our function Object() { [native code] } is ready to use.
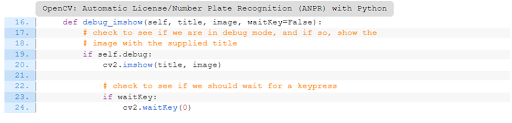
The three parameters that our helper method debug imshow (Line 16) accepts are:
- The desired title for the OpenCV window. If window titles are not unique, OpenCV will replace the picture in the window with the same name rather than make a new one.
- Image: The picture that the OpenCV GUI window will show.
- waitKey: A flag determining whether the display should hold off until a key is depressed.
The debugging image is shown in an OpenCV window on lines 19–24. The waitKey boolean value will often be False. In this lesson, we set it to True to inspect debugging images and dismiss them when we are ready.
Locating possible candidates for license plates
Our first ANPR approach aids in locating the outlines of potential license plate candidates in a picture.

Our locate number plate recognition candidates requires the following two inputs:
- According to this function, the driver script will provide A grayscale image with a probable license plate.
- We’ll only return to this many-sorted license plate candidate contours, so bear that in mind.
We will now generalize to streamline our ANPR pipeline. From this point forward, the majority of license plates have a light background (which is often reflecting) and a dark foreground (characters).
We know there are many situations where this generalization is false, but let’s keep working on our proof of concept to adjust for inverse plates later.
A blackhat morphological procedure is used in lines 30 and 31 to display dark characters (letters, numbers, and symbols) against light backgrounds (the license plate itself). As you can see, our kernel is shaped like a standard international license plate, a rectangle 13 pixels wide by 5 pixels tall.
You’ll get a blackhat visualization like the one in Figure 2 (bottom) if your debug option is enabled:
As you can see, the characters on the plate are visible from above!
The areas of the image that are light and might contain characters from a license plate will be located in the following step:

We apply a closing operation (Lines 36) to fill small gaps and aid in
identifying larger structures in the image using a small square kernel (Line 35). To identify the light regions in our image that might contain license plate characters, lines 37 and 38 apply a binary threshold using Otsu’s technique.
The combined effect of the closure operation and Otsu’s inverse binary thresholding is depicted in Figure 3. Note how the area surrounding the license plate resembles a single, expansive white surface.
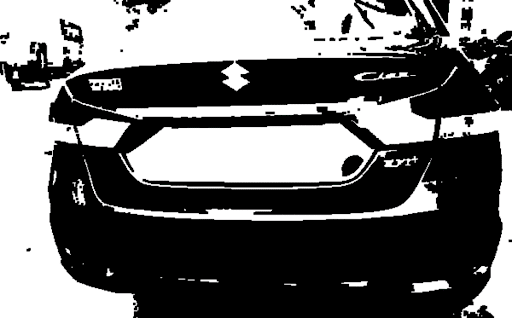
Figure 3 demonstrates how the area around the plate stands out.
The Scharr gradient will highlight the edges of the characters in the license plate and identify edges in the image:
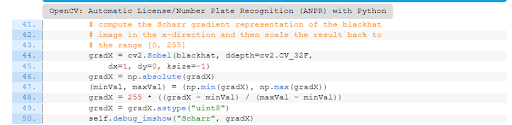
We compute the Scharr gradient magnitude representation in the x-direction of our blackhat image with cv2.Sobel (Lines 44 and 45). The intensities produced are then scaled back to the [0, 255] range (Lines 46-49).
Figure 4 shows how the margins of the license plate characters are highlighted:
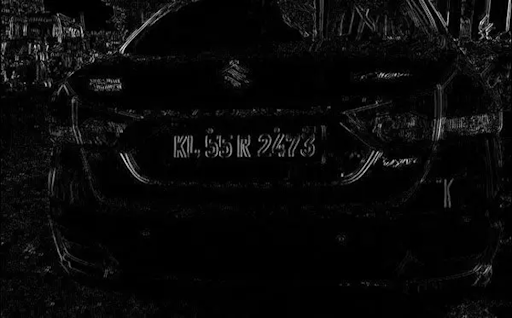
As you can see in the image above, the characters on the plate stand out significantly from the background.
Now, we can group the areas that may include borders for the characters on license plates.

Here, the gradient magnitude picture (gradX) is blurred using a Gaussian algorithm (Line 54). Then, again, we use Otsu’s approach and apply a closure operation (Line 55) and another binary threshold (Lines 56 and 57).
Figure 5 depicts the characters from a license plate in a continuous white area:
These outcomes appear cluttered at first glance. There are numerous more substantial white patches in addition to the relatively defined plate region. Let’s attempt to reduce some of the noise:

To denoise, the thresholded image, lines 62 and 63 conduct a sequence of erosions and dilations:
As shown in Figure 6, the erosion and dilation processes significantly reduced noise in the earlier result from Figure 5. Yet it’s evident that we’re still going.
Let’s add a further pipeline step and utilize our bright areas image there:
We developed a technique to draw attention to lighter areas of the image back on Lines 35–38. (keeping in mind our established generalization that license plates will have a light background and dark foreground).
To disclose the potential license plate candidates, we use this light image as a mask for a bitwise-AND operation between the thresholded result and the light parts of the image (Line 68). We then apply a few dilations and an erosion to fill in gaps and clean up the image (Lines 69 and 70).
Figure 7 depicts our debugging image in its “Final” form. The final call to debug show changes waitKey to True, allowing us as users to examine all previous debugging pictures and push a key when we are ready.
You’ll see that while it’s not the biggest or the smallest, our license plate shape is certainly not the tiniest. That is the image’s second or third largest contour at first glance, and we also note that the plate shape does not touch the image’s edge.
Let’s locate and group contours while we’re on the subject:
Our locate license plate candidates method is now complete, and we:
- Locate each contour (Lines 76-78)
- Reverse-sort them by pixel area, only maintaining the contours and no more.
- Send back the final sorted and trimmed list of cents (Line 82).
Think about what we’ve done with this approach by taking a step back. A grayscale image has been accepted, and typical image processing methods focusing on morphological operations have been utilized to identify several potential shapes that could include a license plate.
Pruning license plate candidates
Using the following technique, we want to identify the candidate contour that contains a license plate the most frequently. But, first, let’s examine its operation:
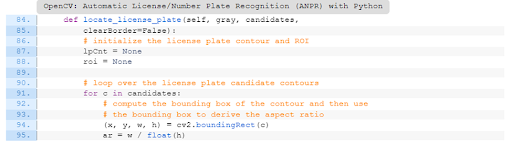
There are three inputs that our locate license plate function accepts:
- our source’s grayscale image
- candidates: The potential license plate contours in this class by the prior procedure
- Boolean indicating whether turned r our pipeline should remove any contours touching the image’s edge is clear order.
Lines 87 and 88 set up the variables to house our license plate contour (lpCnt) and license plate region of interest (ROI) before we start looping over the license plate contour possibilities.
Line 91 is where our circle starts. This loop seeks to separate the license plate’s region of interest from the surrounding contour and extract it. We start by figuring out the contour’s bounding box rectangle, c (Line 94).
We can check that our contour has the appropriate rectangular shape for a license plate by computing the aspect ratio of the bounding box of the contour (Line 95).
The aspect ratio is a correlation between the width and height of the rectangle, as shown in the equation.
We can continue working if the bounding box of the contour meets our requirements for a license plate. First, however, the driver script must decide how to handle this situation because the ROI and lpCnt will remain None.
The aspect ratio should be acceptable and within the range of the minAR and maxAR for a normal license plate. In this instance, we presume we have the contour for the winning license plate! So let’s fill out lpCnt and our ROI now:
- From the current contour, lpCnt is set (Line 102).
- NumPy slicing extracts the ROI (Line 103) before applying Otsu’s binary-inverse thresholding technique (Lines 104 and 105).
Now that the locate number plate recognition procedure is complete, let’s proceed to the subsequent stage:
We can remove foreground pixels in contact with the border of our license plate ROI if our clear border flag is set (Lines 110 and 111). As a result, noise that can affect our Tesseract OCR results is reduced.
Lines 116 and 117 show the following:
- license-plate: The border clearing and ROI pre-thresholding (Figure 8, top)
- ROI for our last license plate (Figure 8, bottom)
Recall that the final call to debug shown in this function changes waitKey from False to True, allowing users to view all debugging pictures for this function and push a key when ready. After pressing that key, we exit our loop and stop considering new alternatives. Lastly, we provide the caller with the 2-tuple containing our ROI and the contour of the license plate.
Tesseract OCR should be able to recognize the characters, therefore, the bottom result is encouraging.
Creating our license/number plate recognition driver script with OpenCV and Python
After implementing our PyImageSearchANPR class, we can create a Python driver script that will:
- Load a disk-based input image.
- In the input picture, locate the plate.
- The license plate’s OCR
- Show the ANPR results on the screen for us.
Let’s search in the project directory for the driver file, which is called ocr license plate.py:

Our custom PyImageSearchANPR class, developed in the “Implementing ANPR/ALPR with OpenCV and Python” section and subsections, is imported here.
We must first create a small string-cleanup tool before moving on.
After accepting it, our cleanup text function parses out all non-alphanumeric characters from a text string. This safeguards OpenCV’s cv2.putText function, which sometimes struggles to produce unusual characters when annotating images (OpenCV will render them as “?” question marks).
Let’s get acquainted with the command line parameters for this script:
Our command-line options are as follows:
- Input: The necessary location of the vehicle picture input directory.
- Clear-border: Indicates whether we’ll trim the margins of our license plate ROI before handing it off to Tesseract (further information is provided in the section titled “Pruning license plate candidates”).
- A 7 means Tesseract should only search for one line of text using its page segmentation mode (PSM).
- Debug: A boolean indicating whether we want to see photos from the debugging stage of the image processing pipeline.
Now that we have our imports set up, our text cleanup tool created, and a command line argument understanding, it is time to recognize license plates automatically!
To begin, we create our PyImageSearchANPR object and provide the —debug flag (Line 26). Additionally, we proceed and import all of the —input image paths using the paths module of imutils (Line 29).
To effectively locate and OCR each license plate, we will process each of our image paths as follows:
We load and resize the image by iterating through our image paths (Lines 32-35).
The image, —PSM mode, and —clear-border flags are passed to our find and ocr method, which primes our ANPR pipeline pump to spew out the OCR’d text and license plate contour at the other end.
You’ve just finished running the driver script’s ANPR/ALPR! Remembering that most of the work is done in the class methods preceding the find and ocr methods. Refer to the walkthrough in the “The central method of the PyImageSearchANPR class” section if you need to review this method again.
Let’s annotate the original input image with the OCR output, assuming that lpText and lpCnt did not return as None (Line 42). Inside the conditional, we:
Compute and depict the license plate contour’s bounding box (Lines 45-47)
- Mark up the cleaned-up lpText string (Lines 52-54)
- Show the GUI window with the annotated image and the license plate string in the terminal (Lines 57 and 58)
- By tapping any key, you can go through all your input directory images (Line 59).
You succeeded! Before moving on to the results section, please pat yourself on the back; you earned it.
ANPR outcomes with Python and OpenCV
We are now prepared to use Python and OpenCV to implement automatic license/number plate recognition.
Download the example pictures and source code using this tutorial’s “Downloads” section.
Next, open a terminal and run the command below for our initial set of test images:

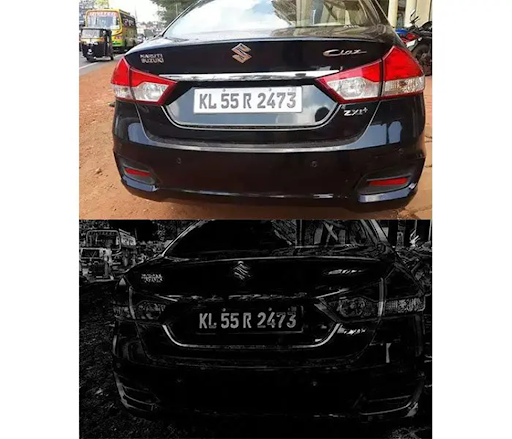
As you can see, all of these photographs have successfully been processed using ANPR, including examples of license/number plates on the front or back of the car.
Let’s test some more photographs, this time ones where our ANPR approach is less effective:
To resolve this issue, utilize our the clear border function to remove any foreground pixels that contact the image’s border and cause Tesseract OCR to malfunction:
We can enhance the ANPR OCR results using the clear border function on these photos.
Each of the examples still contains one error, though. The letter “Z” is mistaken for the number “7” in the top-right case. Likewise, “L” is confused with the letter “E” in the last instance.
Even though these are understandable errors, we would like to improve them.
Although our system is a terrific beginning (and will no doubt wow our family and friends! ), there are some clear restrictions and disadvantages related to the current proof of concept. Let’s talk about these and some suggestions for improvement.
Summary
In this article, you learned how to use OpenCV and Python to create a simple Automated License/Number Plate Recognition system.
To locate a license plate in a picture, our ANPR system used fundamental computer vision and image processing methods, such as morphological operations, image gradients, thresholding, bitwise operations, and contours.
This technique will perform well in controlled, predictable contexts, such as when input photographs have identical lighting and license plates (like dark characters on a light license plate background).
But, if you are creating an ANPR system without a controlled environment, you must start replacing some of our plate localization pipelines with machine learning and deep learning.