Executive Summary
In the ever-evolving realm of artificial intelligence, AI image processing and image predictions have gained remarkable traction. Whether you are a seasoned developer or just beginning your journey into the exciting world of image prediction AI, this blog is here to guide you. We will break down the process step by step, demystify the complexities, and even provide code snippets to empower you on your journey to becoming a pro in AI image processing.
Introduction
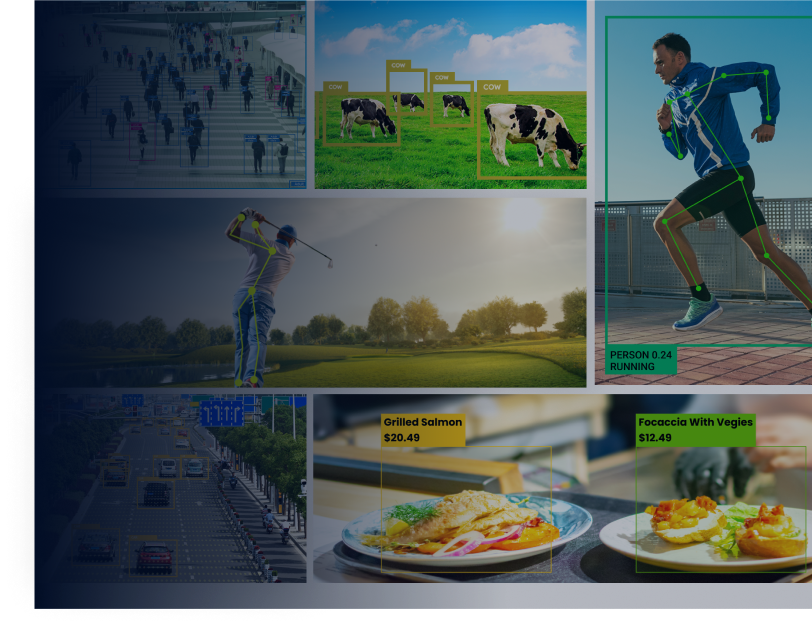
AI image processing is the backbone of numerous applications, from facial recognition systems to self-driving cars. Image predictions AI, in particular, has seen impressive advancements, allowing computers to identify objects, analyze scenes, and even generate captions for images.
Understanding AI Image Processing
Before we dive into the technical details, let’s grasp the fundamentals. AI image processing is all about teaching machines to interpret and analyze images, making sense of visual data much like the human brain does. It involves using algorithms and machine learning models to extract meaningful information from images. This could be anything from identifying objects and patterns to recognizing faces and emotions.
To get started on this thrilling journey, let’s dive into a step-by-step approach.
Image Prediction Guide: Step-by-Step Approach
Preparing Your Environment
To begin your AI image prediction journey, you need a suitable environment. We recommend using Python, a popular language for AI development. First, ensure you have Python installed on your system. Next, install essential libraries like NumPy, OpenCV, and TensorFlow for image manipulation and machine learning capabilities.
# Sample code snippet for installing Python packages pip install numpy opencv-python TensorFlow
Step 1: Data Collection and Preparation
The foundation of any image prediction task is data. Gather a diverse dataset that represents the types of images you want to predict. This step is crucial as the quality and quantity of your data significantly impact the accuracy of your predictions.
# Code Snippet for Data Collection
import os
import cv2data_dir = “path_to_your_dataset”
image_files = os.listdir(data_dir)images = []
for img_file in image_files:
img = cv2.imread(os.path.join(data_dir, img_file))
images.append(img)
Step 2: Preprocessing
Preprocessing involves transforming your raw images into a format suitable for your AI model. Common preprocessing steps include resizing, normalization, and data augmentation.
# Code Snippet for Image Preprocessing
import numpy as npdef preprocess_images(images):
processed_images = []
for img in images:
img = cv2.resize(img, (224, 224)) # Resize to a common size
img = img / 255.0 # Normalize pixel values to [0, 1]
processed_images.append(img)
return np.array(processed_images)
Step 3: Choosing and Training a Model
Selecting the right model architecture is crucial. Convolutional Neural Networks (CNNs) are commonly used for image predictions. Train your model on your preprocessed dataset.
# Code Snippet for Model Training
import tensorflow as tf
from tensorflow import kerasmodel = keras.Sequential([
keras.layers.Conv2D(32, (3, 3), activation=’relu’, input_shape=(224, 224, 3)),
keras.layers.MaxPooling2D((2, 2)),
keras.layers.Flatten(),
keras.layers.Dense(128, activation=’relu’),
keras.layers.Dense(num_classes, activation=’softmax’)
])model.compile(optimizer=’adam’,
loss=’sparse_categorical_crossentropy’,
metrics=[‘accuracy’])model.fit(X_train, y_train, epochs=10)
Step 4: Evaluation and Fine-Tuning
After training, evaluate your model’s performance using a separate test dataset. Fine-tune your model by adjusting hyperparameters and architecture based on evaluation results.
# Code Snippet for Model Evaluation
test_loss, test_acc = model.evaluate(X_test, y_test, verbose=2)
print(“\nTest accuracy:”, test_acc)
Step 5: Making Predictions
Finally, you can use your trained model to make image predictions. This step allows you to extract meaningful insights from new images.
# Code Snippet for Making Predictions
predictions = model.predict(new_images)
Scaling Up
As you gain more experience, you can scale up your image prediction project. Consider using more extensive datasets, experimenting with more complex neural network architectures, and exploring transfer learning to leverage pre-trained models.
Conclusion
AI image processing and image predictions are powerful tools with a wide range of applications. By following this step-by-step guide and utilizing the provided code snippets, you can quickly start your image prediction journey like a pro. Remember, continuous learning and experimentation are key to mastering the art of AI image processing. So, get ready to crack the code and embark on an exciting adventure in the world of AI.
In conclusion, AI image processing and image predictions offer incredible potential for various industries, and mastering these skills can open doors to exciting opportunities in the field of artificial intelligence.

Dawood is a digital marketing pro and AI/ML enthusiast. His blogs on Folio3 AI are a blend of marketing and tech brilliance. Dawood’s knack for making AI engaging for users sets his content apart, offering a unique and insightful take on the dynamic intersection of marketing and cutting-edge technology.


